These 6 things include: selecting the optimal hosting provider, configuring the right WordPress and Elementor Pro settings, uploading your assets in WEBP (for images) and WOFF2 (for fonts), uploading a few code snippets, using a caching plugin and a CDN for faster loading times worldwide, and keeping the plugin count to only the essentials.
What You'll Learn
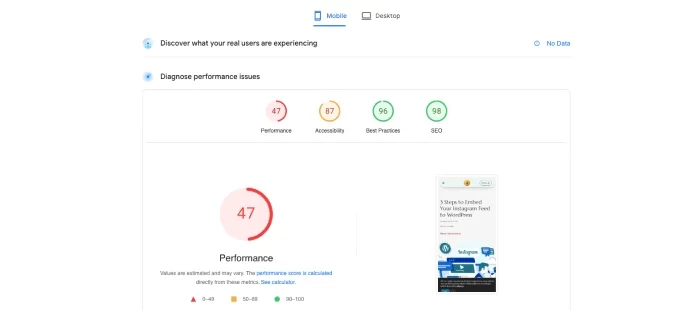
To counter the bulkiness that Elementor Pro is famously known for, there are 6 things that you can (and should do) to help boost your Elementor Pro site for speed and performance from this:
Mobile page speed insights: Before
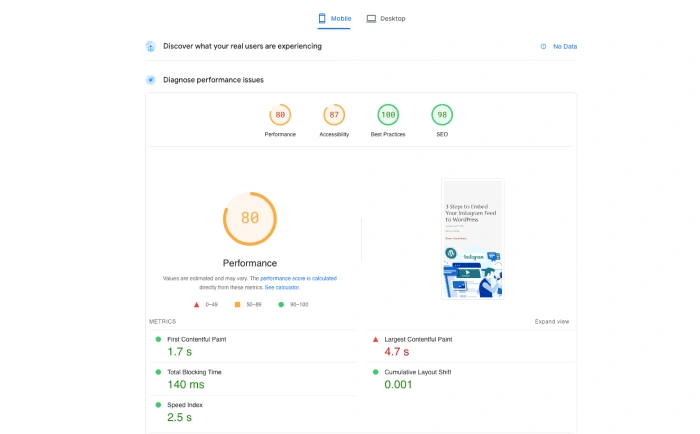
To almost x2:
Mobile page speed insights: After
Key Takeaways:
Choose a reliable hosting provider to ensure optimal website performance.
Configure WordPress, Elementor Pro, and code snippets.
Upload images in next-gen formats and add cache and CDN plugin.
About Elementor
Elementor is a popular page builder that allows you to create and manage websites easily. It powers millions of websites worldwide, from personal blogs to e-commerce sites.
Unfortunately, Elementor is famously known for its bulkiness and slow speed times. But, Elementor has made many improvements over the years for this specific issue. Now, achieving good website speed with Elementor Pro by modifying a few key features and settings, plus adding a few other things can help you achieve good loading times.
1. The Right Hosting Provider for Elementor (Essential)
The first and most important step to building any Elementor Pro site is selecting the right (and optimized) hosting provider. While there are many to choose from, it is important to select one that meets Elementor’s requirements.
A key requirement is WordPress and PHP memory. Elementor recommends a PHP memory of a minimum256MB, but 768MB or higher is recommended.
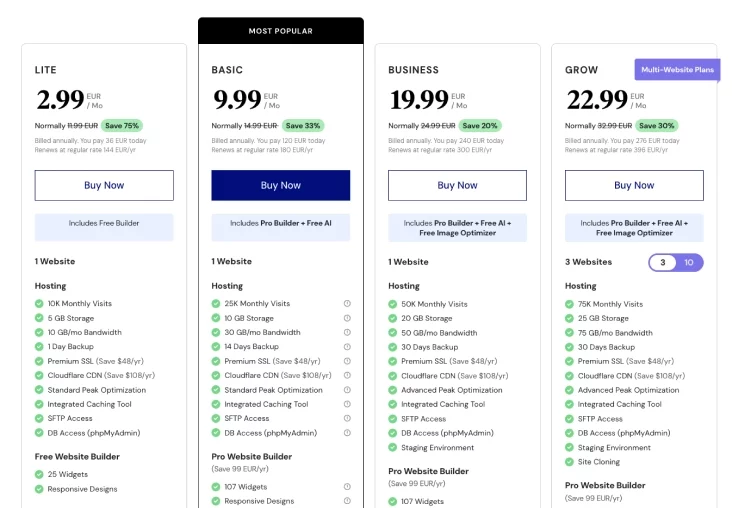
Elementor Hosting
Elementor offers it’s own unique hosting plans tailore-made for Elementor sites.
Elementor Hosting
Elementor hosting benefits:
Made specifically for Elementor sites.
Elementor Pro page-builder is included in the “Basic” plans (saves you $99/year).
The basic plan starts at $120/per year (renews at $180/year).
Includes a free CDN (all plans).
Elementor Hosting negatives:
It is relatively new to the hosting market.
Elementor hosting is strongly recommended if building a WordPress site using Elementor Pro. It saves you money in the long run (choosing the “Basic” plan or greater), and is fully optimized for the Elementor Pro page builder.
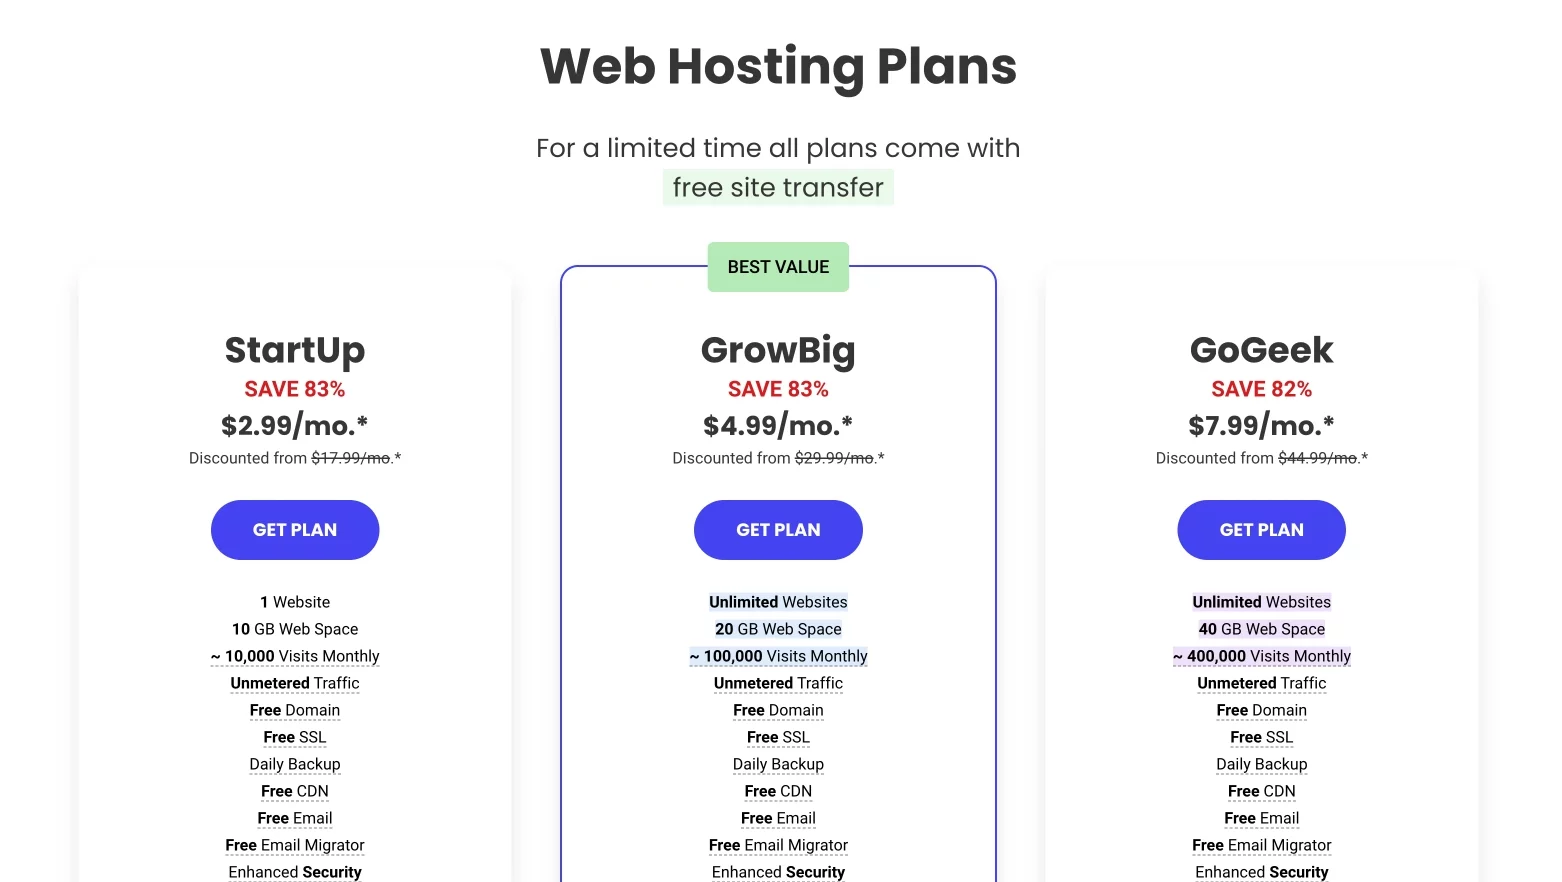
SiteGround Hosting
SiteGround is a popular hosting chose for Elementor as it meets Elementor requirements.
Siteground benefits:
Offers pricing at $2.99/month for the first year ($17.99 after that).
2. WordPress and Elementor Settings for Speed Optimization (Beginner)
Before starting any WordPress or Elementor site, the very first thing to do is configure the correct settings.
For WordPress
Let’s configure the WordPress setting for maximum speed optimization. There are only a few settings to configure…
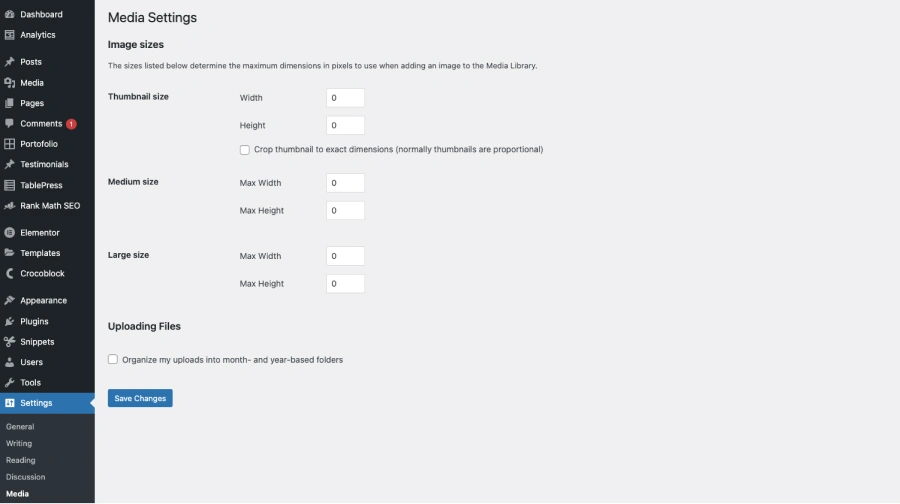
Media settings:
Go to “Settings”, and select “Media”. Make sure to set all the values to “0”
Media settings
This make sure that no copies of your images are stored in these different sizes within your database.
Permalinks:
Go to “Settings” and select “Permalinks”. Make sure that “Post name” is selected.
Permalinks settings
This is best practice for both boosting perfomance and Search Engine Optimization (SEO).
In terms of WordPress settings, you’re all done. Easy…
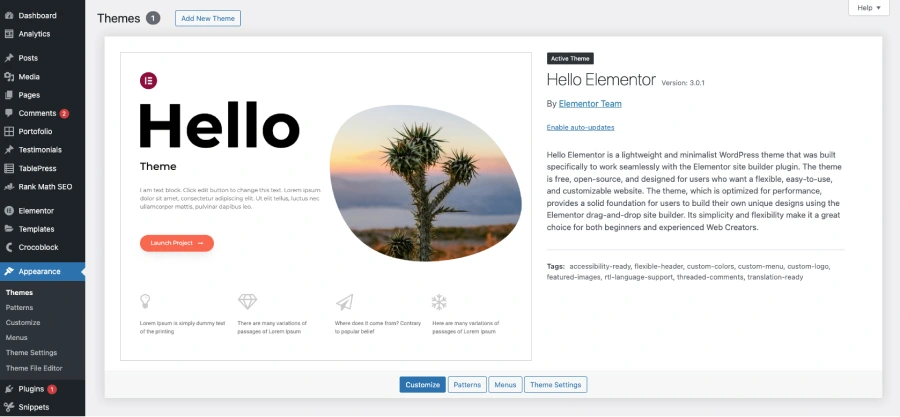
Delete Unused Themes
Delete any WordPress theme you are not using. If you are using Elementor Pro as your page builder, you should only have the Hello theme in your WordPress theme folder.
Go to “Appearance”, select “Themes”, and delete any theme that you are not using.
For Elementor Pro
Note: you will need Elemntor Pro in order to configure some of these settings.
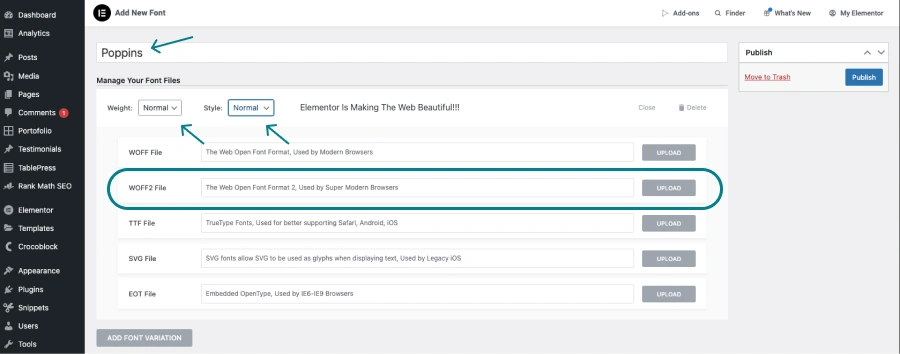
Custom fonts:
Elementor Pro allows you to upload your own custom fonts. This will save you some loading time. This works especially well when disabling Google fonts (see how later on).
Head over to Elementor, and select “Custom Fonts”, and “Add New”.
Note: you can easily download fonts from Fonts.Google.
Add custom fonts
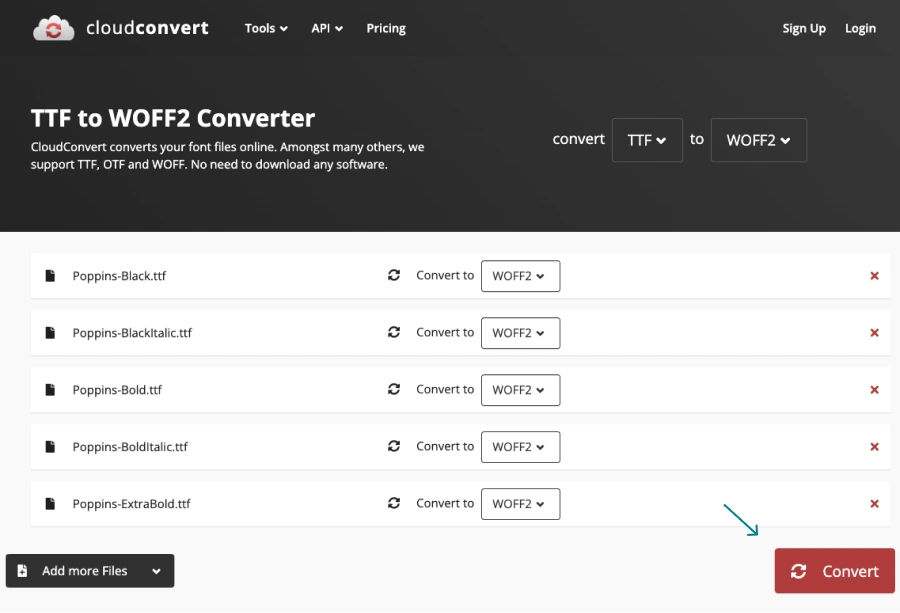
As you can see, you have the option to upload different font types (weight and style), and different formats. You should upload all your font types in the WOFF2 format as it is the most lightweight.
To convert all your font types to WOFF2, head over to this TTF to WOFF2 converter and upload your fonts by selecting and converting them.
Convert to WOFF2
Now, you are ready to add all of your font variations (or only the ones you need) to the Elementor. Just make sure to get the font weight and style right when uploading.
Here are the common font weight name mappings:
Value
Common weight name
100
Thin (Hairline)
200
Extra Light (Ultra Light)
300
Light
400
Normal (Regular)
500
Medium
600
Semi Bold (Demi Bold)
700
Bold
800
Extra Bold (Ultra Bold)
900
Black (Heavy)
950
Extra Black (Ultra Black)
Advanced settings:
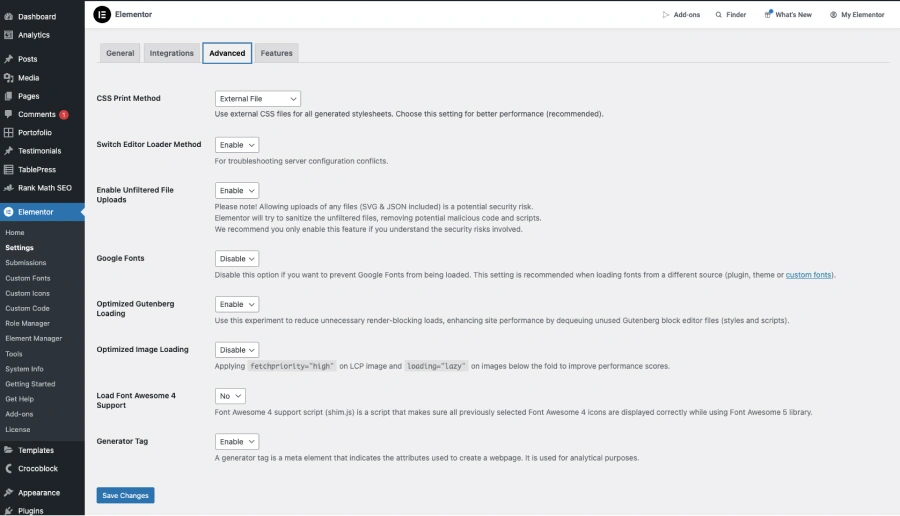
In your WordPress dashboard. Go to Elementor, select “Settings”, and go to the “Adnavced” tab. Here, make sure that all of these settings are “Disabled”:
Google Fonts (you do not need this as long as you uploaded your custom fonts as above).
Optimize Image Loading.
Load Font Awsome 4 Support.
And, make sure these are set to “Enabled”:
Optimized Gutenberg Loading.
Enable Unfiltered File Upload (for uploading Lottie files and SVGs).
Elementor Advanced Settings
Features settings:
Now, head over to the “Features” tab.
Make sure that you ONLY enable the features that you plan or are currentls using.
Note: this entirely depends on the type of site your are building.
Element manager:
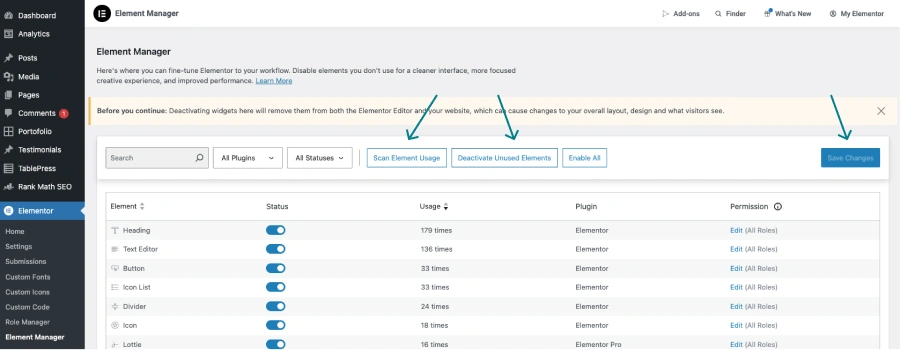
Elementor Pro now allows your to deactivate any widgets or elements that you are not using. This further boosts your Elementor site speed performance.
Warning: If you are still in the process of building your site with Elementor, leave this step for the very end.
Go to Elementor, and select “Element Manager”. “Scan Element Usage”, and “Deactivate Unused Elements”. Hit save.
Deactivate unused elements
This will remove any Elementor widgets and elements your site is not using and free up some space which is why, you should leave this step for the very end.
3. Boost Elementor Pro Speed with Code Snippets (Beginner)
Using some specific code snippets provide below will help boost your Elementor site’s speed performance by providing and extra kick to the steps we configured earlier.
Note: You will need to download the FREE plugin Code Snippets before moving on.
Once you have downloaded the free plugin. Adding a new code snippet is easy. Go to “Snippets” and “Add New”. Then, you just need to copy and paste the code snippets provided below. Make sure to hit “Save” and “Activate” when you’re done.
/**
* We will Dequeue the jQuery UI script as example.
*
* Hooked to the wp_print_scripts action, with a late priority (99),
* so that it is after the script was enqueued.
*/
function wp_remove_scripts() {
// check if user is admina
if (current_user_can( 'update_core' )) {
return;
}
else {
// Check for the page you want to target
if ( is_page( 'homepage' ) ) {
// Remove Scripts
wp_dequeue_style( 'jquery-ui-core' );
}
}
}
add_action( 'wp_enqueue_scripts', 'wp_remove_scripts', 99 );
Remove Unused CSS
function exclude_specific_css_files($src, $handle) {
// List of CSS file URLs to exclude from minification
$excluded_css_files = array(
'/wp-content/plugins/elementor/assets/css/frontend-lite.min.css',
'/wp-content/plugins/elementor-pro/assets/css/frontend-lite.min.css',
);
// Check if the current CSS file URL matches any of the excluded URLs
foreach ($excluded_css_files as $excluded_css_file) {
if (strpos($src, $excluded_css_file) !== false) {
return $src; // Return the original unminified CSS file
}
}
// If the CSS file is not in the excluded list, proceed with minification
return minify_css_content($src);
}
function minify_css_content($content) {
$content = preg_replace('/\s+/', ' ', $content); // Remove extra whitespaces
$content = str_replace(array("\r\n", "\r", "\n", "\t"), '', $content); // Remove newlines and tabs
4. Compress And Optimize Images Before Upload (Beginner)
Optimizing images by compressing them and converting them in the next-gen format (WEBp) can significantly reduce page load times and improve site performance.
Use an image converter tool to convert your JPG or PNG images into WEBp. For this, we will be using my own creation.
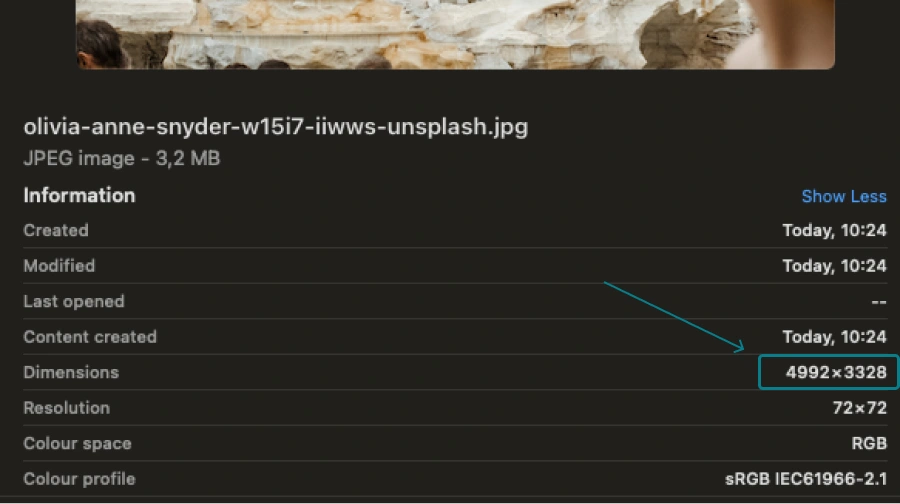
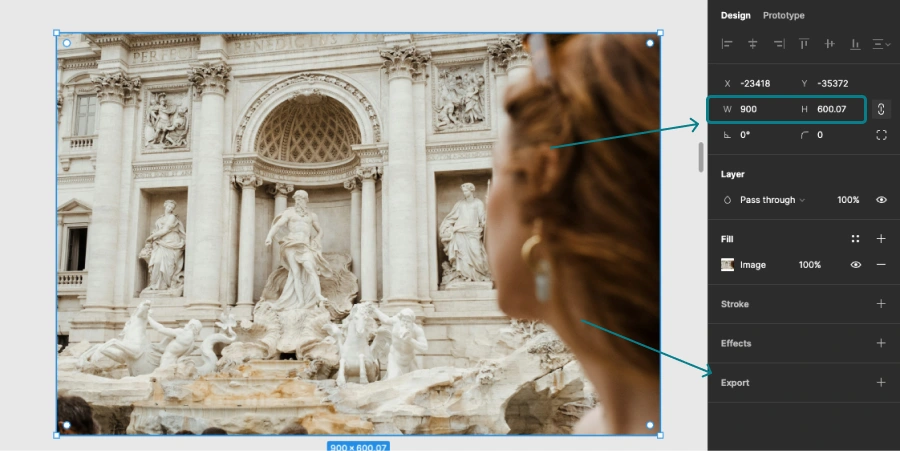
First, make sure that your images are not over-sized in terms of dimensions. For example, if your image is 4992 × 3328 pixels (this is very typical especially if downloading from free image directories like Unsplash), you should first adjust the image size to fit a web application.
Too large
I typically set my images to 1280 x 720 pixels or smaller before converting them into WEBp.
To achieve this, use a free tool like Figma or Canva and reduce the dimension. In this case, I reduced them to 900 width x 600 height. Make sure to export you images in JPG (or PNG if your image has a transparent background).
Reduce image dimensions in Figma
Now, all you have to do is go to your image converter of choice, upload your image (or images), make sure to convert them into WEBp, select a quality between 80% and 100%, and convert.
Covert your images in bulk to WEBp
Image optimization is a vital aspect of website development as it not only enhances performance but also reduces bandwidth consumption, making your site more cost-effective.
On a side note:
When optimizing images, don’t forget to resize them to the correct dimensions for web display and use descriptive filenames and alt tags for improved SEO.
5. Add a Caching Plugin (and CDN) for Faster Load Times (Advanced)
The next and final step is to use a cache plugin. For this, we will use the LiteSpeed cache plugin. It is free to use.
Important: you should only activate and work on a caching plugin AFTER you’re done building your site.
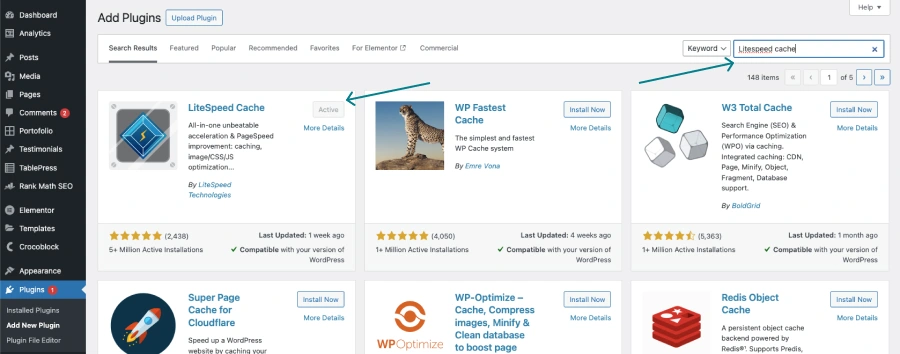
Head over to “Plugins”, select “Add New Plugin”, and search for “LiteSpeed Cache”. Now, “Install” and “Activate” the plugin.
Activate Litespeed Cache plugin
There are many things you can do with this plugin and it can be a case of trial and error sometimes.
Very important: create a backup of your site before configuring any settings in LiteSpeed Cache (or any caching plugin for that matter).
So, before you get started, open your site in a new window both on desktop and on mobile (this is so you can make sure you are not breaking anything when modifying the settings).
However, if you follow this step-by-step, you should be ok.
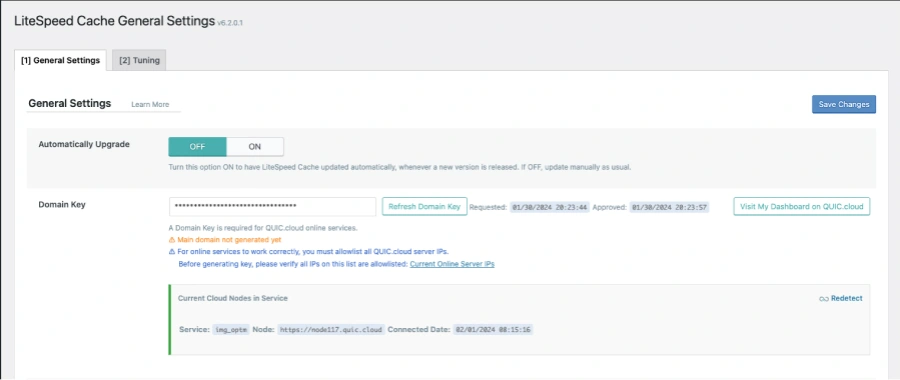
LightSpeed Cache: General Settings
This is where you configure the important things like connecting to their QUIC.cloud servers. This step is required to use the QUIC.cloud CDN and LiteSpeed Cache effectively.
You should see an option to “Request a Domain Key“. Click it, wait a few seconds, refresh the page and it should be done.
Now, I recommend you click on the “link to QUIC.cloud” button and connect your domain name to QUIC.cloud services and create an account.
Request key and connect to quic.cloud
Follow the steps to create your account and connect your domain name.
This will allow you to:
See detailed usage, statistics & even errors for all services
Purchase additional quota if you run out
Set up & manage all QUIC.cloud CDN options
Easily open a QUIC.cloud support ticket
Manage multiple domains in one place
Once you are all done connecting to QUIC.cloud, go back to the general settings in the LiteSpeed cache plugin, and let’s continue.
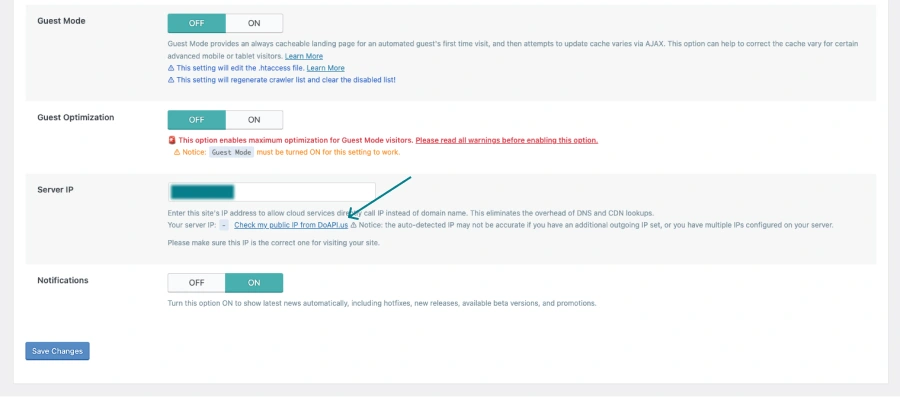
For Guest Mode and Guest Optimization, I have these set to OFF (test the options yourself by selecting them one by one, saving the settings, and checking your live site on both desktop and mobile).
If your site is fine, you can keep these on. If not, leave them off. For me, these two settings were causing issues…
Select the “Check my public IP from DoAPI.us” option. This will show your current IP address. Copy and paste it in.
Configure the rest of the general settings
Make sure to save changes, and you’re done.
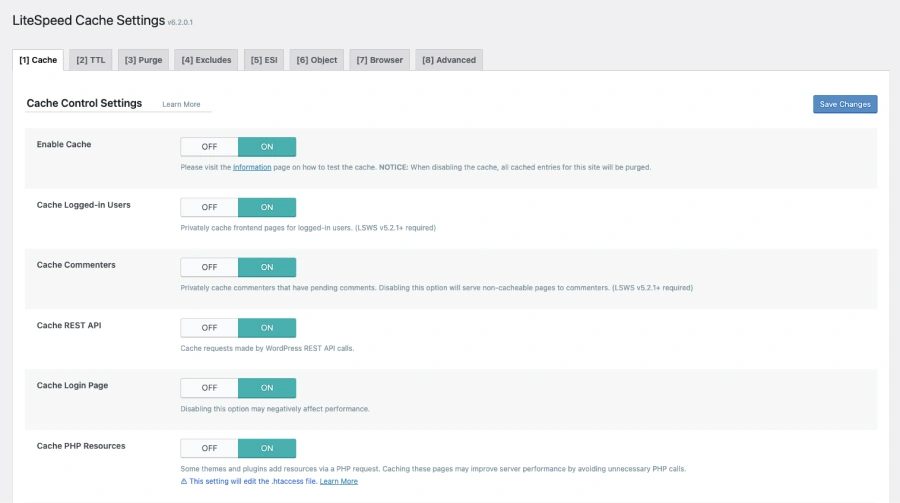
LiteSpeed Cache: Cache Settings:
Normally, these settings should all be active right out of the box and ready to go. There are only a few we need to change.
LiteSpeed Cache: Cache settings
Cache: Make sure “Cache Mobile” is turned on.
TTL: don’t touch.
Purge: should all be good.
Exclude: this is where you can add specific URLs that you wish NOT to be cached. Generally, you should leave it as is.
ESI: Make sure that “Cache Admin Bar” is set to off (no need for that).
Object: Make sure “Object Cache” is on. And, turn off “Cache WP-Admin” (again, no need for that).
Browser: “Browser Cach” set to on.
Advanced: Leave it as it is.
LiteSpeed Cache: CDN
First of all, what is a CDN?
A content delivery network (CDN) is like a bunch of “helpers” spread out all over the world, each holding copies of your website. Things like images, videos, and pages. That way, when someone wants to visit a website, they can quickly get it from a nearby “helper”, making everything on your site load faster.
Note: If you have selected one of the recommended Elementor hosting providers from above, they each have their own CDNs so you don’t need to worry about this setting. But, in case your hosting provider does not offer a CDN, follow these steps.
1. CDN Settings: Set the QUIC.cloud CDN to on.
You don’t need to do anything else on the tab.
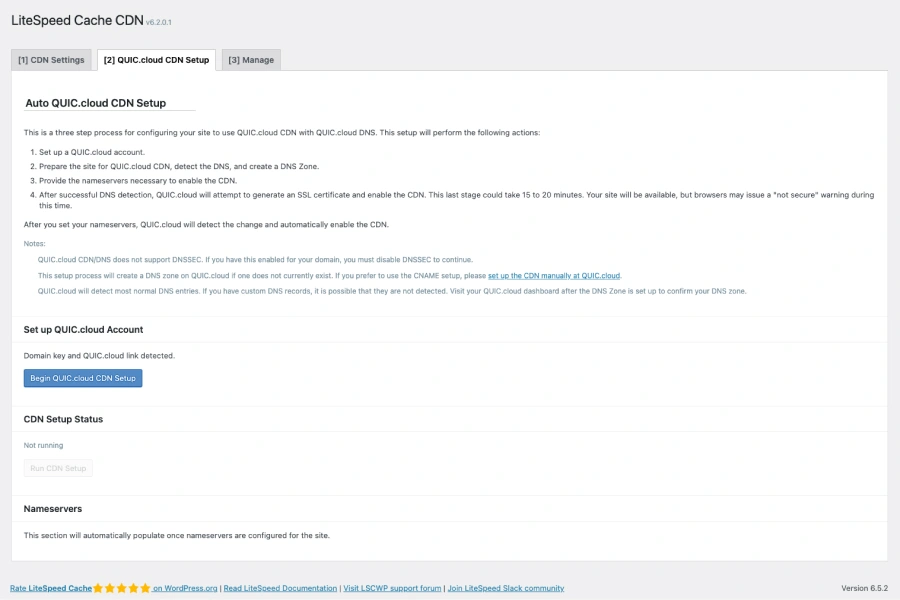
2. QUIC.cloud CDN Setup: Click the “Begin QUIC.cloud CDN Setup”.
Automatic CDN Setup
Follow the steps required to connect to your existing QUIC.cloud account (the one you created earlier when requesting the domain key).
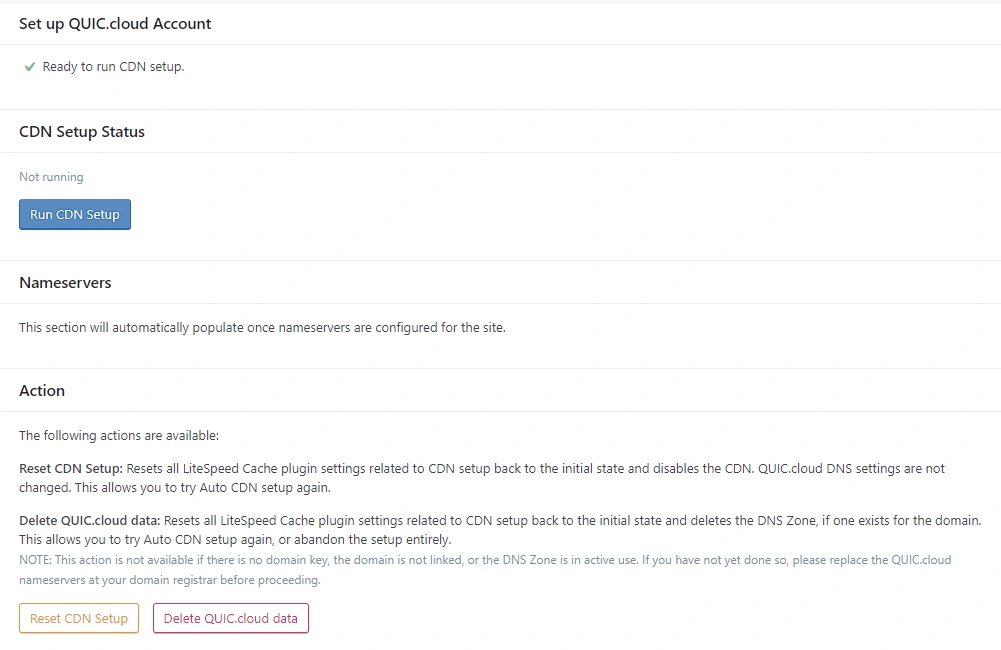
3. Automatic Linking: Your site will automatically link to QUIC.cloud and bring you back to the setup page, showing “Ready to run CDN setup.”
Ready to run CDN
4. Start CDN Setup: Click the “Run CDN Setup” button. The status will change to “In Progress.” Later, when setup is nearly complete, click “Refresh CDN Setup Status.” You will receive an email confirmation of this.
Handle Errors (if any): If there’s an error, fix it if you can and click “Run CDN Setup” again. If you can’t fix it, contact QUIC.cloud Support for help.
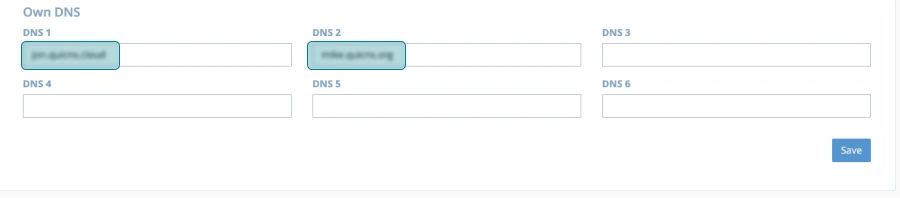
5. Verify Nameservers: Make sure your nameservers at your domain registrar match the QUIC.cloud nameservers. This might require you to log into your domain registrar and update some records.
Add nameservers to your DNS records
You need to update your DNS servers at the domain registrar. This could be Godaddy, Namecheap, your hosting provider, or wherever your domain name is located.
Keep in mind, that the user interface will look different for you. I am using DinaHosting as my hosting provider here (this is where my domain is located).
Replace your current DNS 1 and DNS 2 names with the onse provided to you by QUIC.cloud. Delete any other DNS records that are not your QUIC.cloud ones.
Replace your DNS records
Important: If you are not sure what it is you are doing, please contact the company support via chat or phone. This will ensure a smooth process as they should know exactly what you are trying to achieve and therefore guide you through the process.<s/pan>
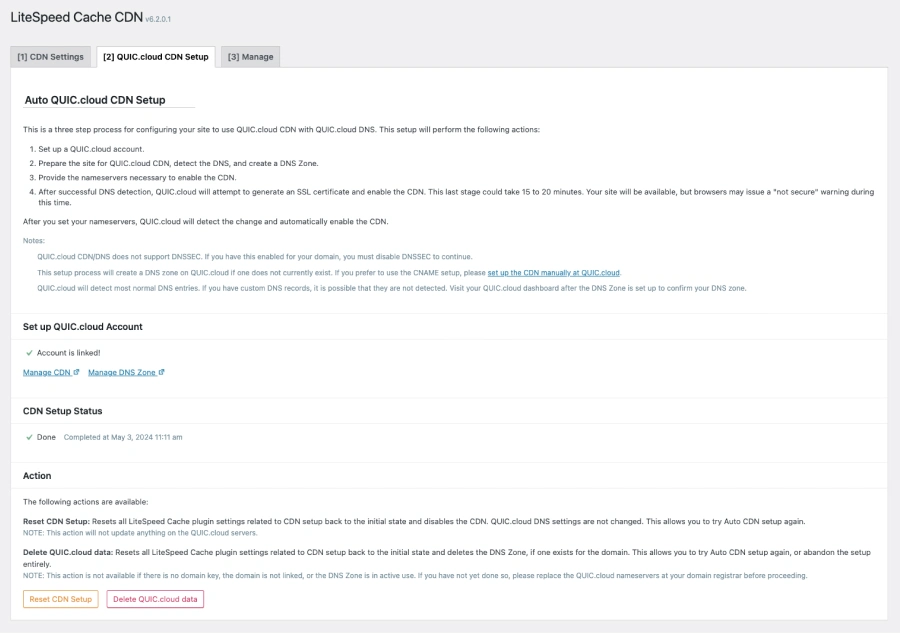
6. Complete the Setup: Once QUIC.cloud detects the nameservers, the setup status will change to “Done.” This could take up to 48 hours.
QUIC.cloud CDN is Done and connected
7. Manage Your Settings: After setup, use the links provided to manage your CDN and DNS settings from your QUIC.cloud Dashboard.
8. SSL Certificate: QUIC.cloud will create an SSL certificate for your site, which might take 15-20 minutes. Your site might show a warning about insecure content until this is complete, but it will go away once the SSL certificate is ready.
LiteSpeed Cache: Image Optimization
If you followed the above steps and are uploading your images to your WordPress site already in WEBp and with optimized dimensions, there is little to do here.
Go straight to Image Optimization Settings.
Since I upload all my images in WEBp and since they carry very little weight (100kB or less on average), I will only configure a few settings here.
Turn everything on EXCEPT:
Optimize Original Image AND Optimize Losslessly
LiteSpeed Cache: Image Optimization
LiteSpeed Cache: Page Optimization
This is where the real magic happens and where you will see most of your Elementor Pro’s page speed increase the most.
Warning: These are the settings that tend to break websites sometimes. So, make sure you are constantly checking your live site on both desktop and mobile to spot anything weird.
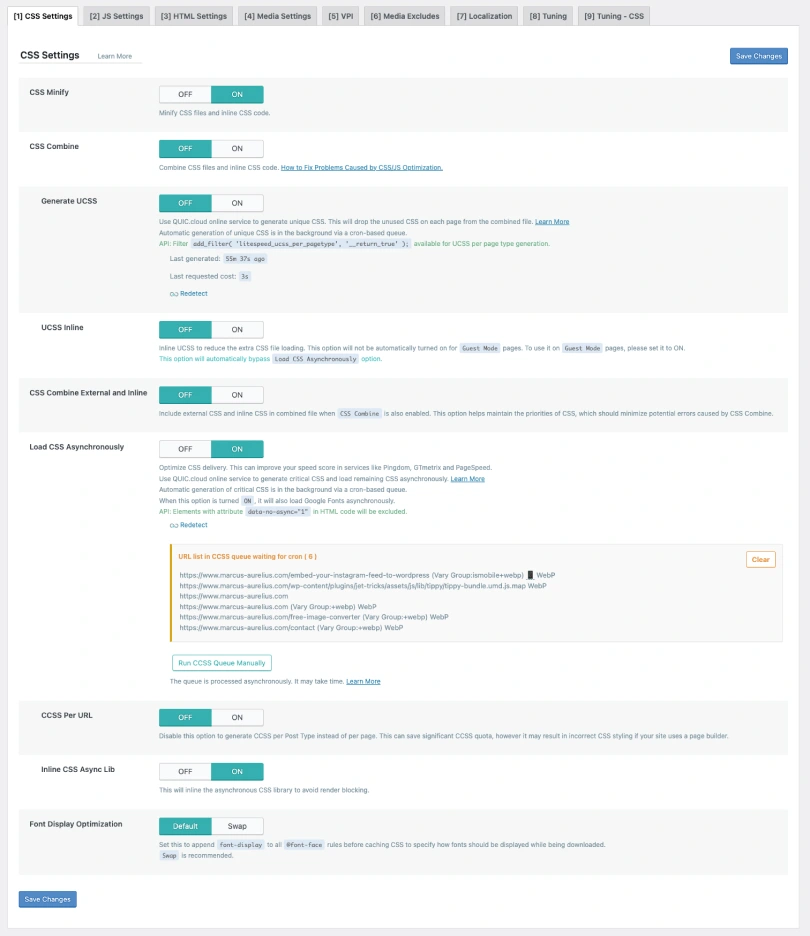
CSS Settings:
Configuring the CSS settings is mostly where I tend to find issues with Elementor site breaking. Through trial and error, these are the CSS setting that work best for most of my sites:
Leave everything off EXCEPT:
CSS Minify, Load CSS Asynchronously, and Inline CSS Async Lib. Everything else is OFF.
CSS Settings
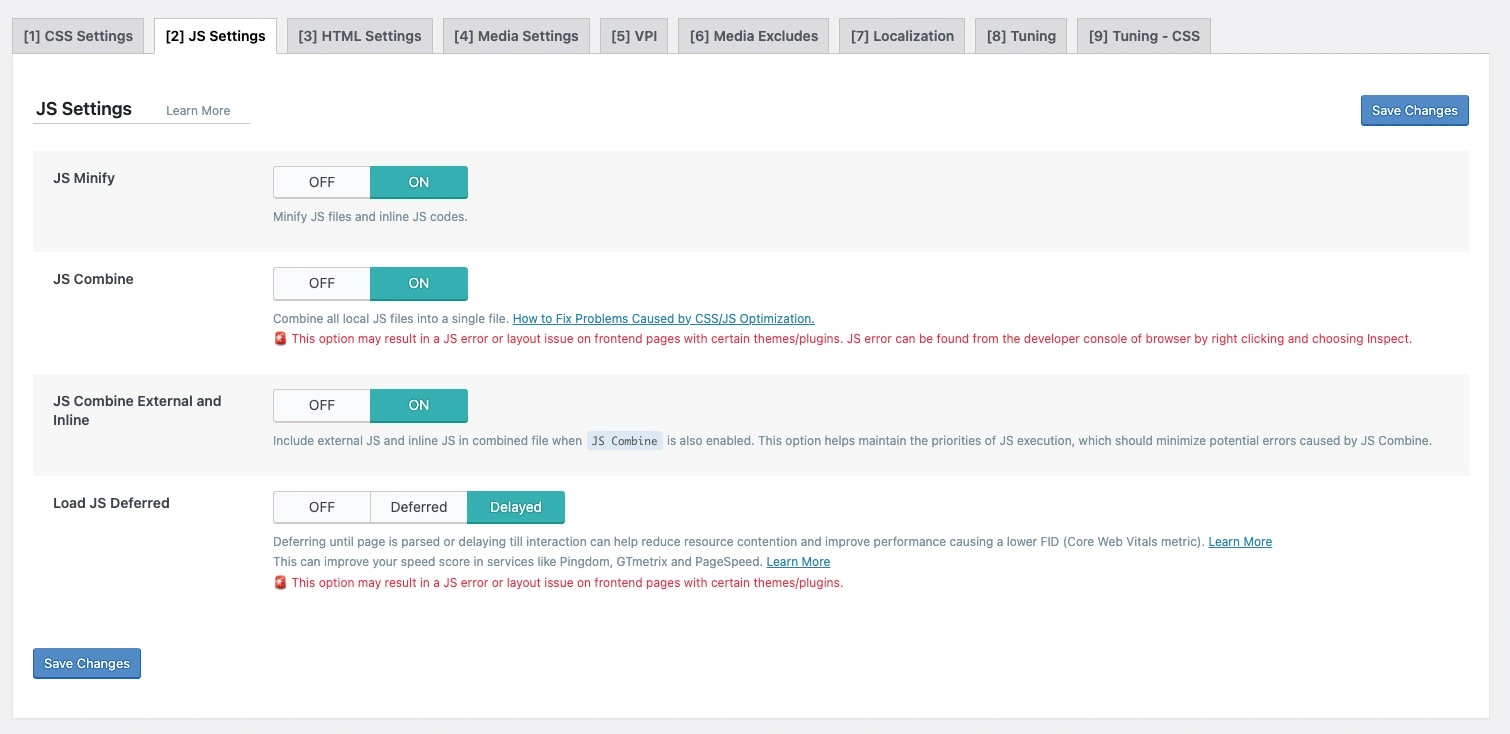
JS Settings:
This is where I see the most speed-boosting results. I tend to turn on all Javascript settings.
Turn all settings on for JS Minify, JS Combine, and JS Cobine External and Inline.
Regarding the Load JS Deferred, this is really up to you.
If set to “Deferred”, it will provide a small boost but all your JS will load normally.
If set to “Delayed”, all JS will only load once the visitor starts an action (scrolling for example). I find that this provides the highest boosting potential.
So I set it to “Delayed”.
JS Settings
Minifying CSS and JavaScript files can streamline code, reduce file sizes, and improve site performance.
Minification involves the process of removing unnecessary characters, white spaces, and comments from code without affecting functionality, resulting in smaller files that load faster.
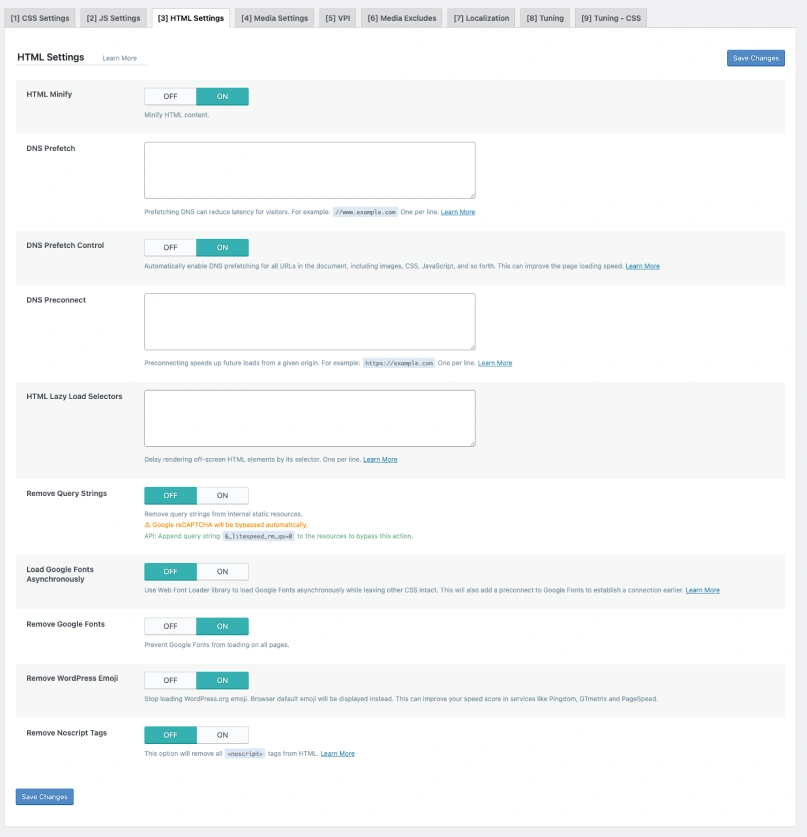
HTML Settings:
Issues with configuring the HTML settings are less frequent but still possible. So, keep checking your site as you change any of these settings.
HTML Minify: ON
DNS Prefetch: ON
Remove Google Fonts: ON – Since we uploaded our own custom fonts locally earlier, we don’t need Google Fonts.
Remove WordpPess Emoji: ON
Everything else should be OFF.
HTML Settings
Media Settings:
Here we only need to configure one single setting. Because we are preventing the lazy loading of all images from the code snippets mentioned above, we will ignore all of the next tabs…
All you have to turn on in the Media Settings is:
Lazy Load iFrames: Set to ON.
Media Settings
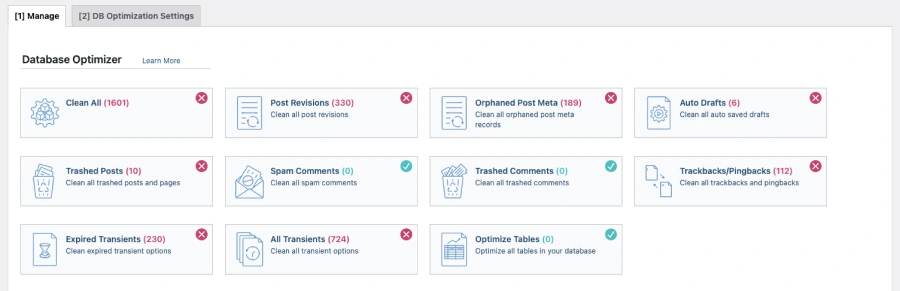
LiteSpeed Cache: Database
The Database optimization in LiteSpeed Cache is a great and simple way to clean out your database of any unwanted fluff or space.
The red “X” means that there is some speed-boosting potential in cleaning up the database. The green check mark tells you that it has already been cleaned out.
In most cases, you can go ahead and select the “Clean All” section to free up some memory space.
Databas Cleaner
Optimizing your WordPress database involves cleaning up unnecessary data, optimizing tables, and reducing bloat to help boost site speed. Regularly checking and cleaning the LiteSpeed Cache Database section can enhance speed and efficiency.
Another key technique for cleaning up and optimizing the WordPress database is removing unused plugins and themes that might contribute to data overload.
A well-optimized database not only speeds up site performance but also ensures that the site operates smoothly, leading to better user experience and enhanced SEO rankings by improving page loading times and decreasing server load.
Database optimization is essential for maintaining a high-performing Elementor and WordPress site.
6. Limit the Number of Plugins
I know that it is tempting to add a ton of plugins to help enhance the look, design, and interactivity of your website, but you should really be avoiding adding non-essential plugins. This will only result in slowing down your site.
One of the great benefits of using Elementor Pro as your website builder is that it has most of everything you need to build a fully functioning branded site that can also turn into a lead magnet.
You should only be adding essential plugins that help enhance the speed, functionality, and SEO optimizations of your website. Let Elementor Pro do the rest (popups, custom code, forms, connect to email marketing services, etc.).
Limiting the number of plugins on your WordPress site can reduce conflicts, improve performance, and streamline maintenance. By using only essential plugins and avoiding excessive installations, you can optimize site speed and stability.
Regularly Monitor and Optimize Website Performance
Continuous monitoring and optimization of your WordPress website performance is key to maintaining speed, stability, and user satisfaction. Continuously use tools like PageSpeed Insights by Google or Pingdom by Solarwinds, assess performance metrics, and identify areas for improvement.
Frequently Asked Questions
1. How can I customize my WordPress settings for optimization?
To customize your WordPress settings for optimization, go to the “Settings” section in your WordPress dashboard. From there, you can make changes to your site’s general, writing, reading, discussion, media, and permalinks settings.
2. What are some key settings to focus on for optimizing my WordPress site?
Some key settings to focus on for optimizing your WordPress site include enabling caching, compressing images, setting up a CDN, and optimizing your site’s code. These can all improve your site’s speed and performance.
3. Can I change my WordPress settings without any coding knowledge?
Yes, you can change your WordPress settings without any coding knowledge. WordPress has a user-friendly interface that allows you to easily customize your site’s settings. However, if you do have coding knowledge, you can make more advanced changes by editing your site’s code.
4. How often should I review and update my WordPress settings for optimization?
It is recommended to review and update your WordPress settings for optimization on a regular basis, such as every few months. This ensures that your site is always running at its best and taking advantage of any new optimization techniques or plugins.
5. What is the benefit of customizing my WordPress settings for optimization?
Customizing your WordPress settings for optimization can greatly improve your site’s speed and performance. This can lead to a better user experience, higher search engine rankings, and potentially increased traffic and conversions.
6. Are there any plugins that can help with customizing WordPress settings for optimization?
Yes, there are many plugins available that can help with customizing WordPress settings for optimization. Some popular options include WP Super Cache, Smush Image Compression and Optimization, and W3 Total Cache. Be sure to research and choose the best plugin for your specific site’s needs.
Views:66
Get Fresh Content
Join a mailing list of over 1,000 people that receive new content monthly.
What You'll Learn
Related Content
Read more related content or visit our knowledge base.
Key Highlights Email marketing is a highly effective strategy for lead generation and can be maximized by WordPress email marketing plugins. These plugins offer advanced
Key Highlights Start your online store today with easy steps Choose a domain name that reflects brand Utilize marketing tools to reach your target audience
This website uses cookies so that we can provide you with the best user experience possible. Cookie information is stored in your browser and performs functions such as recognising you when you return to our website and helping our team to understand which sections of the website you find most interesting and useful.
Strictly Necessary Cookies
Strictly Necessary Cookie should be enabled at all times so that we can save your preferences for cookie settings.
If you disable this cookie, we will not be able to save your preferences. This means that every time you visit this website you will need to enable or disable cookies again.